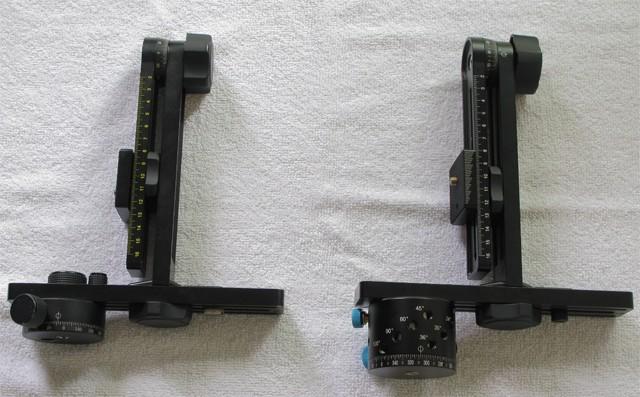
Pre-Production Nodal Ninja 5 (left) and New Nodal Ninja 5/RD16 (right)
Introduction. About 18 months ago I reviewed a pre-production version of the Nodal Ninja 5 tripod head. I was favorably impressed, and have been using it ever since for a lot of my panoramic photography. Recently, Nick Fan, the head of Fanotec and creator of the Nodal Ninja, sent me a newer version of the Nodal Ninja 5 (hereafter "NN5") with a RD16 rotator to review.
I have spent a couple of weeks putting the new NN5/RD16 through its paces, and this review contains some of my thoughts and observations. The new NN5 is very similar to one that I reviewed 18 months ago in many respects. The main difference is in the rotator base (the RD16). So, in the interest of brevity and not wishing to repeat myself, I'll focus here only on what is new or changed. You may want to have a look at my previous review before reading this one.
What's New? The biggest single difference is the new RD16 rotator. Just to be clear on terminology, this rotator is part of the lower arm, and allows the photographer to move the camera in a left/right direction. The NN5 also has an "upper rotator" (pictured below), that is at the junction of the vertical arm and upper arm, and is what allows the camera to move up/down...this is discussed in more detail later. The new rotator adds a little weight to the NN5...I measured it to add about 150 grams or 5 ounces compared to the previous version I reviewed. The quick reference guide on the NodalNinja website says that the NN5/RD16 combination weighs 995 grams, or 2 lb 3 oz. The new rotator appears to be a fundamentally different design from the previous one I reviewed, having dispensed entirely with any sort of user-adjustable tensioning screw that seemed to be problematic in some earlier models.
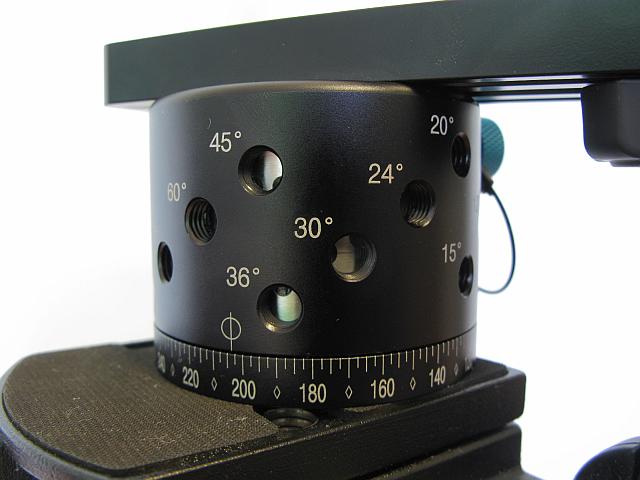
The new rotator allows the user to engage or disengage a new detent mechanism that provides "click stops" as the head is rotated. The real advantage over the previous rotator is that the user can choose the spacing of these stops from 120 degree increments all the way down to 3.75 degree increments. There are a total of 16 choices (120, 90, 60, 45, 36, 30, 24, 20, 18, 15, 12, 10, 7.5, 6, 5, 3.75 degrees) allowing you to pick an increment that is well suited for almost any lens between an ultra wide angle/fisheye lens and telephoto lens. On a "full-frame" DSLR, the 3.75 degree increment is suitable for lenses as long as about 350mm (assuming portrait orientation and minimal overlap), and on "cropped-sensor" size cameras, the 3.75 degree increment is appropriate for lenses as long as about 220mm. You can use my angular field of view calculator to determine the appropriate increment for any focal length lens.
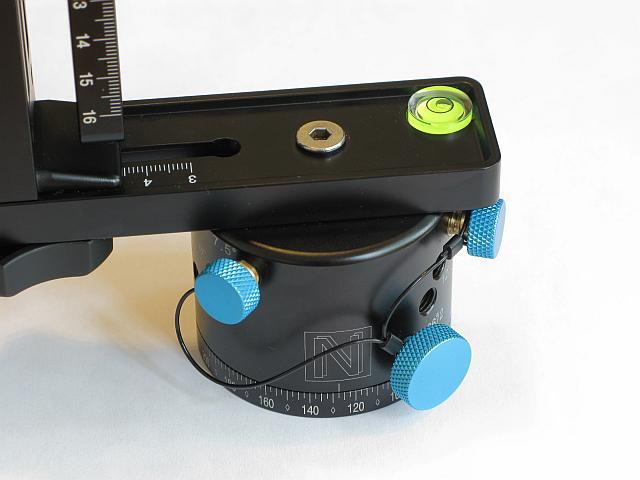
The detents are engaged or disengaged by tightening/loosening one (or two for the finest increments) thumb screw(s) into the appropriate hole(s) in the rotator. For example, to engage the detents at 45 degree increments, simply insert and tighten the screw in the 45 degree hole.
The previous NN5 I reviewed also had the option of click stops, but changing the increment required purchasing and replacing a plate inside the rotator mechanism...a fiddly process that one was unlikely to do often, if ever, while shooting. In contrast, the new mechanism is quick, simple and easy to use.
The new rotator head looks like it has been significantly redesigned in a number of other respects as well. One thing that I noted was that, unlike the old rotator, the new rotator does not allow the user to adjust the tension, or force with which one must push in order to rotate the head. I found that the tension was fine for my use (a small DSLR with mid-range and telephoto zoom lenses), and as long as it doesn't loosen over time I won't have any desire to make changes. I mention this because, as improved as the previous NN5 head was over the original Nodal Ninja 1 that I tried, I learned that it did exhibit a very gradual tendency to loosen over time, and I occasionally had to tighten the knob that adjusted the tension. However, this looks to me to be a fundamentally different design so I don't expect it to loosen over time. I haven't detected any change during my daily use over the last couple of weeks.
The upper rotator also has a newly designed click stop mechanism that is engaged via a lever next to the knob that adjusts the tension between the upper arm to the vertical arm. When engaged, it is designed to provide stops at 15 degree increments, when rotating the upper arm. However, I didn't find this mechanism to be so useful for me. Initially, I had assumed that this mechanism would work similarly to the lower rotator...i.e. providing a series of "click-stops" at 15 degree increments. However, I found myself unable to move the upper rotator when the lever was engaged. It wasn't until after I watched this video that I realized that I was incorrect in my assumption about how the upper rotator ought to work. In fact, the lever engages a "positive locking mechanism" that effectively locks all motion in the upper rotator, allowing the head to hold very heavy camera/lens combinations in place with no slippage. The locking mechanism can only be engaged when the upper arm is at one of the 15 degree positions. In order to move to a different "locked" position, one must first loosen the knob that holds the upper and vertical arms, rotate the upper arm by 15 degrees (until the next lock position is found), and then retighten the knob. I guess this would be useful for folks with cameras/lenses that are so heavy that they need the extra stability provided by a "locked" upper arm, but I didn't need this for my DSLR (Canon T1i) and lenses (including a 70-200 F4 L lens). I ended up disengaging the lever and the click stops in the upper rotator for all of my shots. To be honest, even if this mechanism did work like the lower rotator (i.e. providing a series of click-stops), I'm not sure that this feature would be nearly as useful as the click stops on the lower rotator because the increments cannot be changed, so are only likely to be useful for a small range of focal lengths.
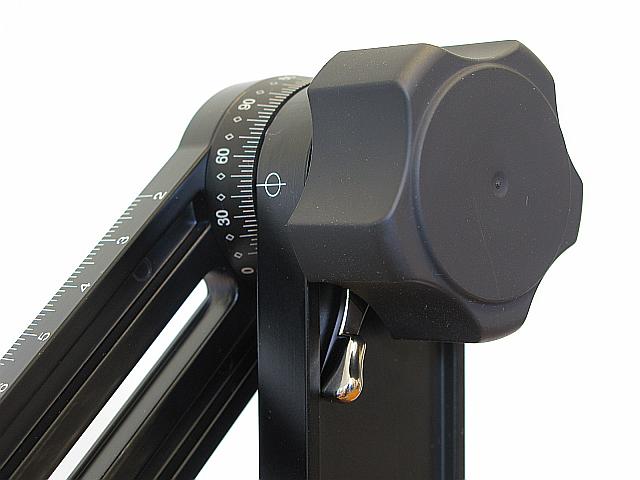
I noted a number of other smaller, but very nice, refinements to the previous model. For example, the engraving on the vertical arm that shows the number of degrees by which the upper arm is rotated has been repositioned so that it can be seen from eye-level rather than from above. This is useful when panning the camera vertically over scenes where there is little or no detail (e.g. blue skies), and one wants to rotate by a specific amount.
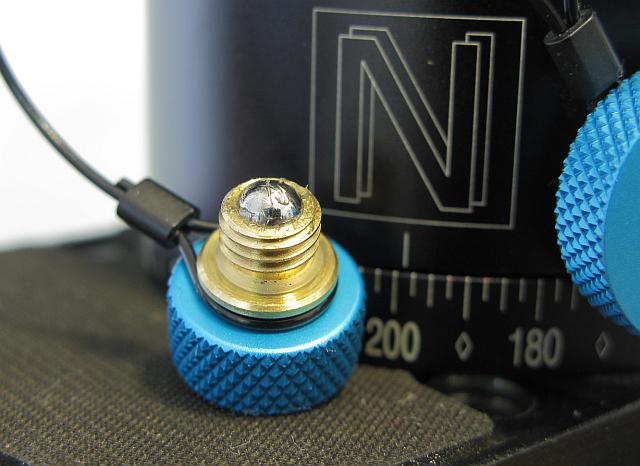
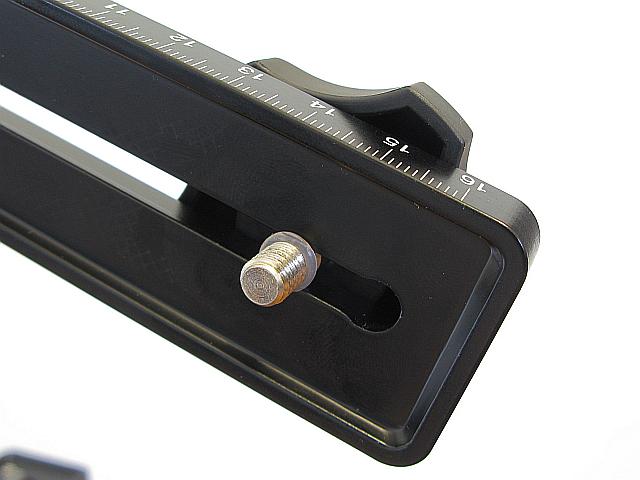
Another nice change was the addition of a small "0-ring" to the knob/screw that tightens the camera mounting plate to the upper arm. In the previous NN5, the knob/screw would fall out of the upper arm once the camera plate was disconnected, so I always had to be careful about losing this part. I usually ended up screwing it back into the mounting plate attached to the base of camera even when not using the NN5. This prevented me from losing the piece, but made it difficult to put the camera down on a flat surface. In the new NN5, the new o-ring means that the screw remains in the slot in the upper arm. A simple, but nice touch.
Similarly, the knobs that hold the vertical arm in place have been changed, and the new ones are much easier to tighten with fingers, rather than a coin or screwdriver that was better for the old knobs.
How Well Does It Work? In use, I found this to be the best pano head I have tried so far. The new rotator worked excellently, and I surprised myself a little in that I ended up using it with the click stops engaged for almost every scene I shot. I suspect other photographers have known about this forever, but sometimes I can be a little slow on the uptake, and so it was a pleasant surprise to me to learn how useful the click stops could be. I found several areas that are worth noting:
Solving the "Blue Sky" problem. The click stops allowed me to rotate the camera by a fixed amount very accurately. Normally, it isn't particularly important to rotate by a fixed amount as most modern panoramic stitching software can determine how much the camera has rotated by looking for common feature points between adjacent images. As long as there are enough features in the overlap region between adjacent images, the software ought to be able to figure out how much the camera was rotated. Where this does become important -- crucial, in fact -- is wherever the scene doesn't contain enough detail to allow the software to figure out the rotation amount. Large expanses of blue skies is a good example of this problem, as are scenes with a lot of water. The previous NN5 was quite useful in that it had an engraved scale that allowed me to rotate by a specific amount quite accurately by watching the scale as the head is rotated. Of course, this didn't work too well in the dark. And, it wasn't nearly as accurate as the click stops in the new NN5, particularly when rotating by small amounts such as 5 degrees. Of course, the scale is still present on the new NN5, and this is still very useful for keeping track of start and end positions for multi-row panoramas.

This mosaic of the Lincoln Memorial is an excellent example of the "blue sky" problem, in that many of the source images in this 105 image mosaic were featureless blue sky. I used a 150mm lens for this scene, which covers a field of view of just under 6 degrees (in portrait orientation on my Canon T1i DSLR). I set the RD16 rotator click stops at 5 degree increments, and fired away. Using PTAssembler, I was easily able to stitch the images together. Once the software had determined the location of the images that did contain detail, I was easily able to manually position the remaining "blue sky" images. Because I knew that the RD16 had rotated in exactly 5 degree increments, I was able to manually position the blue sky images using PTAssembler's position interpolation logic.
Precarious Positions. I found that the click stops were useful when the tripod was positioned somewhere tight or precarious and I couldn't stand behind the camera to judge the amount of rotation. Having the tactile and audible feedback of the click stops allowed me to rotate the head accurately even when I wasn't able to see the camera's viewfinder or LCD screen. For example, this mosaic was taken with the tripod balanced on a thin rock outcropping, far too narrow to accomodate the tripod with me behind it. However, standing at arm's length distance, I was able to rotate and capture all the images without needing to look through the viewfinder or at the screen.
Stacking and repeatability. I found that the new NN5 was a real help when taking focus blended panoramas, i.e. a panorama where each image in the panorama is created by stacking multiple images taken at different focus settings to achieve greater depth of field than would normally be possible with a single image.
When capturing the images necessary for creating a focus blended panorama, there are essentially two ways in which one can operate. The first way is to rotate the panoramic head as infrequently as possible, but change focus frequently: At each position of the panoramic head, one captures as many images as necessary (at different focus settings), before moving on to the next position. The second way is the opposite...change the lens focus as infrequently as possible, but rotate the head freely. Using this second approach, one takes all the pictures in the panorama (or row in a mosaic) using one focus setting, then adjusts the focus, and then takes a second set of pictures at the new focus settings. The difficulty with this second approach is that you need to be able to return the head to its previous positions when shooting the second set of images. At least, being able to shoot from the same position for all images in a stack makes things a lot easier, and generally leads to better results.
Previously, I had always used the first of these two approaches when shooting focus blended panoramas. I found that I couldn't reposition the camera accurately enough using the second approach, and this had a negative impact on the quality of the resulting focus blended images. However, because the first approach necessitates repeated adjustment of the focus for each shot, it is very hard (often impossible) to ensure that all images in the series are taken at the same focus settings, and this can sometimes lead to problems when blending the focus stacked composite images together. However, the new NN5's click stop mechanism is sufficiently precise that I changed my approach. I started using the second approach (rotate the head frequently, but change the focus infrequently) and got excellent results. The click stops allowed me to reposition the camera to (almost) exactly the same position when returning the camera to a previously used click stop. The images weren't sufficiently well aligned that I could dispense with some subsequent software alignment, but they were very close (usually under 1/10th of a degree). I was very impressed with the accuracy and repeatability of positioning when using the click stops, and this has allowed me to improve the quality of my focus blended panoramas.

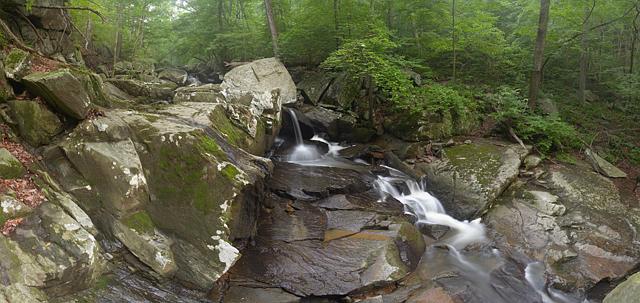
This mosaic of Difficult Run, in Great Falls National Park, is a good example of focus blending. I used a total of 35 images for this scene. There are 3 rows of 7 images per row in this mosaic, with the bottom 2 rows consisting of 2 images at each position. Focus blending allowed me to capture the scene so that everything, from the rock in the bottom right corner in the foreground to the trees in the distance, is in focus. I used a 48mm lens on a Canon T1i DSLR for this scene. Even though the field of view for this combination is about 17 degrees, I set the RD16 to rotate in 5 degree increments, but rotated through 3 "clicks" (i.e. 15 degrees) when moving the head. In fact, I often ended up leaving the click stops at a small increment (e.g. 3.75 or 5 degrees) and just varied the number of "clicks" that I rotated depending on what focal length lens I was using. One suggestion I have for a future improvement would be to create a rotator base that only has clickstops for the finest increments (e.g. 3.75 degrees and 5 degrees).
Speed, reliability and comfort. One advantage to using click stops that I hadn't considered was that it allowed me to capture images considerably more quickly. Prior to using the new NN5 my normal mode of operation was to rotate the camera while looking through the viewfinder to ensure that I had rotated far enough, but not too far. This works pretty well, but it does require that you pay attention to what you are doing...rotate a little too far and you'll end up with adjacent images that don't overlap, which means you'll have a "hole" in your final panorama. I soon found that I was using the click stops to rotate the head for all of my panoramas, and rarely looking through the viewfinder. I still look through the viewfinder if I'm shooting a scene with moving objects, and need to make sure that I pick the right moment to shoot (i.e. when a moving object isn't half in and half out of a frame). However, for static scenes, I found this to be an excellent way of working. Not only is it more reliable, but I found it to be much quicker, taking only a second or so to rotate the camera between shots. For example, using the click stops, I was able to capture all 105 images for the Lincoln Memorial mosaic (above) in just over 7 minutes. This is extremely quick considering that the shutter was open for more than 3 minutes of this time (I used shutter speeds varying from 1 second to 2.5 seconds), and I used mirror-lockup for all shots (meaning that I paused briefly between locking up the mirror and opening the shutter). This was much quicker than I would have been able to manage without the click stops, and it would surprise me if a motorized pano head could do much better. I also found it to be more comfortable for me, since I often don't extend my tripod fully in order to increase its stability, but being quite tall, I end up having to bend over to look through the viewfinder...something that becomes tiring after a while.
Conclusion. I have to admit that I was skeptical at first that the new NN5 would be much of an improvement over the (already excellent) older model that I tested 18 months ago. Sure, the new model has a new lower ("RD16") rotator, but the old model seemed to work pretty well, and the new one looked like it was just going to add more weight to my camera bag...something I'm never happy about. Well, it does add a little weight (about 150 grams or about 5 ounces, as best as I can measure using my not-very-accurate measuring scale), but after a couple of weeks of pretty heavy use, I'm convinced that the advantages really outweigh the small weight penalty. The new RD16 rotator works flawlessly, and not only do I find it makes taking panoramic images much easier and quicker, but I feel that it has also made my results better, particularly for large mosaics and focus blended panoramas.
There are a number of other small, but useful, refinements as well...the sorts of things that might not be obvious when looking at a spec sheet or web site, but become immediately apparent when you use the device in the field. I found the upper rotator's click stop mechanism to be far less useful, but might be of use to folks with very heavy gear who need the support providing by its positive locking mechanism. All in all, But, I ended up with an extremely positive view of the Nodal Ninja 5 and RD16 Rotator...a device that I have no hesitation in recommending to anyone interested in a high quality, professional level panoramic tripod head.