|
Introduction. As interest in creating panoramic and stitched digital images has grown, so has the recognition that the difference between producing an OK result and an excellent result often comes from choosing the right equipment. Cameras and software programs get the most attention, but equally important is the choice of a panoramic tripod head. While it is possible to create panoramic and stitched images without a panoramic tripod head, the results are much more consistent when using one. Historically, panoramic tripod heads have tended to fall into two categories: (1) heavy, bulky, expensive "professional" models, and (2) home-made, amateur solutions. However, this has started to change, with the advent of new models by small startup companies that offer lighter, cheaper models that are more "profressionally" built than most amateur solutions. One of the most recent entries in this "prosumer" class of tripod head is the Nodal Ninja, created by Nick Fan. What is it? The Nodal Ninja Tripod Head is a low-cost (about US$120), light-weight spherical panoramic tripod head. Its purpose is to allow the camera to rotate around the lens' "exit pupil". This point is also called the "nodal" point...hence the name of the Nodal Ninja. By rotating around this point, all parallax errors can be eliminated. For a great description of parallax error (and a visual example) have a look at Panoguide's description. Parallax errors are the most common reason why most stitching programs fail to assemble panoramic images correctly. Unlike many other panoramic tripod heads (professional and amateur), the Nodal Ninja is designed to rotate around the nodal point in two dimensions (left/right and up/down), and is referred to as a "spherical" tripod head. This is very important because it allows for the creation of multi-row mosaic images...my speciality. Tripod heads that only rotate around the nodal point in one dimension only allow for the creation of single row panoramic images.
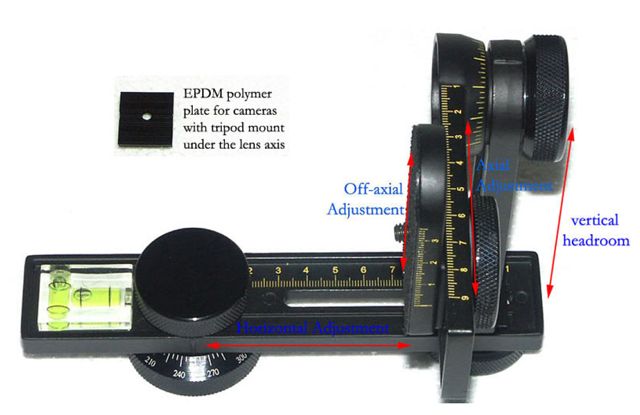
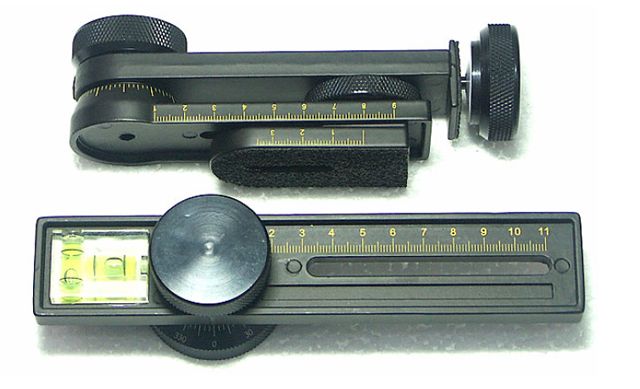
Construction/Features. The Nodal Ninja is made of lightweight aluminum and weighs about 600 grams, or 1.3 pounds. Compared to professional models, it is extremely light-weight. (It is very similar in weight to the Panosaurus, which weighs about 630 grams, or 1.4 pounds.) The Nodal Ninja is also deceptively small. In fact, the entire package arrived in such a small padded envelope that I thought it must be missing some parts. But, no, all parts were included. The Nodal Ninja is constructed so that the three major arms (horizontal arm, vertical arm and axial arm) can all be easily disassembled by hand (no screwdrivers needed), and the entire pacakge can be laid flat inside a bag or envelope. When disassembled, the entire pano head can be stored in a box or envelope about 7x3x2 inches. A very nice compact design. The quality of workmanship appears very high. The three major arms, and almost all of the other parts are made from black aluminum. The three knobs that are used to adjust the (1) vertical rotation angle (pitch), (2) horizontal rotation (yaw), and (3) axial offset are all large and have textured edges...they are easy to operate in the cold with gloves. Due to the Nodal Ninja's small design, I suspect that it will be possible to change the battery for most cameras without removing it from the axial arm. This is a real advantage when the battery dies in the middle of a long sequence of images, and you don't want to disturb the tripod head to change the battery. A two axis level mounted into the lower horizontal arm, crucial for the precise leveling of the camera required by some software packages. I've typically used a "bullseye" level which features one bubble inside a circular well, but the two axis level works just as well. Engraved on the base unit where the tripod head attaches into the tripod (the "horizontal turntable"), is a 360 degree scale marked in 5 degree increments. There are no click stops or detents on the scale, although I don't see this as a problem. In fact, I see this as an advantage, as I frequently use zoom lenses at "non-standard" focal lengths and click stops at precisely marked intervals generally aren't too useful for me. A similar scale is also inscribed onto the axial arm where it rotates around the vertical arm. The Nodal Ninja's instruction manual gives illustrations and specifications on the parts included in the package, and how to assemble the parts. I found the assembly easy enough to figure out without reading the instructions, but there are a few items that you'll probably miss if you don't read the instructions. For example, the Nodal Ninja comes with an EPDM rubber plate that is designed to be mounted to the tripod socket of cameras where the tripod socket is directly underneath the lens axis. For other cameras, an "off-axial adapter" plate is also provided. This is likely to be important for small digicams, where the tripod socket is often located towards the side of the camera, rather than in the center, in line with the lens axis. Unlike some professional models, the Nodal Ninja mounts directly on top of a standard 1/4" bolt. This means that you can sit the Nodal Ninja directly on top of your existing tripod head, rather than having to unscrew the head (which usually requires tools) and attach the head directly to the tripod legs. It also means that you can use it with tripods where the head and legs are inseparable (i.e. almost all tripods sold for $20-$100). The Nodal Ninja will likely appeal to digicam users because of its very small size, and its ability to be easily disassembled into a very small package for transportation without needing any tools. Not only is it the smallest panoramic tripod head I've seen, it also disassembles the most completely and easily. The markings on the horizontal and vertical turntables, as well as the rulers along the horizontal and axial arms allow for the Nodal Ninja to be quickly reassembled to precisely the correct configuration. Another nice touch is a groove along the horizontal arm that allows for the insertion of a custom label: Once you've found the correct configuration for your camera you can insert a label into the groove to remind yourself of the correct positioning for your camera.
Who Is This Tripod Head For? The Nodal Ninja is clearly aimed at the digicam user. Nick says that the Nodal Ninja is designed for prosumer digicams, and that its size fits "most prosumers like a glove." In an e-mail to me, Nick wrote: "Any DC with tripod socket under the lens axis will work perfectly, they include: Canon S30/40/45/50, Sony F505, F707, F717, F828, Olympus E10/20, Fujifilm S602Z/s602ZPro/s7000z/s20Pro, panosonic LC 1/ Leica Digilux2. Other DCs with off axis tripod socket confirmed to work (at least at full wide): Olympus C-8080, Nikon cp5000/5700/8700 with/without battery grip, minolta Dimage 5/7/7i/7hi/A1/A2/A200, Panasonic Fz10/15/20." Although the Nodal Ninja is clearly designed with the digicam user in mind, it only worked with one of three digicams that I had at my disposal durnig the test. While it worked well with the Canon s40, it didn't work correctly with an "ancient" Nikon 900 (circa 1999), and a more recent Nikon Coolpix 2100 digital camera. When used with the Nikon 900, I found that the Nodal Ninja's off-axial adapter wasn't long enough to accommodate the fact that the tripod mount on this camera is about 5.5 centimeters from the lens axis. Because of this, I was unable to align the camera's nodal point with the horizontal axis. Additionally, the camera could not be slid far enough forward on the axial arm to allow it to be aligned with the veritcal axis. The Nikon 2100 was a better fit, but still not perfect. The offset between the tripod socket and the lens axis is sufficiently small that the Nodal Ninja's off-axial adapter allowed it to be mounted so that the nodal point was in line with the horizontal axis. However, as was the case with the Nikon 900, I was unable to slide the camera far enough forward to allow the nodal point to be aligned with the vertical axis. Because of this, I could easily see parallax errors in the camera's LCD screen when rotating the camera left/right. I think what is needed for these types of cameras is a "L" shaped adapter...one leg of the L being used to accomodate cameras where the tripod socket is not underneath the lens axis, and the other part of the leg being used to slide the camera forward far enough on the axial arm that the nodal point is aligned with the vertical axis. Despite the problems I encountered, I suspect that the Nodal Ninja will probably work with most larger digicams where the tripod socket is aligned with the lens axis. Looking over the reviews of recent 6-8 megapixel offerings from Nikon, Canon, Minolta and other manufacturers, I suspect that most of these will probably work with the Nodal Ninja. Of course, my experience does suggest that it is critically important that you determine the correct nodal point for your camera, and contact the manufacturer and ask about their panoramic head's specifications before making a purchase. I understand that most people won't bother to do this, but I can't stress enough how important this is.
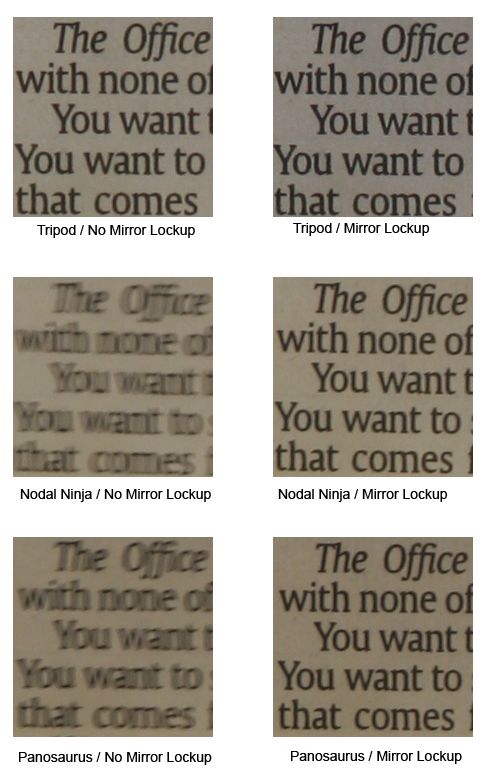
Does it work with Digital SLRs? Despite the fact that the target market for the Nodal Ninja is "prosumer digicams", I suspect that a lot of digital SLR owners will want to know if the Nodal Ninja will work with their cameras. In my testing, the answer was, "yes and no". I found that it was a less than perfect match for my digital SLR camera because of its small size. Specifically, the "axial adjustment" (the amount you can slide the camera back/forwards along the length of the lens) is quite limited. The range is just about 4.5 centimeters, or a little more than 1.5 inches. Moreover, this range starts about 4 centimeters behind the rotation point between the axial and vertical arms and extends back to about 8.5 centimeters. This means that the nodal point for your camera/lens must be between 4 and 8.5 centimeters from the tripod socket in order for correct positioning to be achieved. If the correct positioning of your camera requires a location that is less than 4 centimeters, or greater than 8.5 centimeters, it is possible to use the "off-axial adapter" to shift the adjustment backwards or forwards about 3 centimeters, by mounting the off-axial adapter onto the axial arm. (In this configuration, the off-axial adapter is really a misnomer because it isn't being used to shift the camera off-axis, but to increase or decrease the distance of the camera from the point at which the vertical arm and axial arm rotate.) However, this doesn't increase the 4.5 centimeter adjustment range, it merely moves its start and end points. For zoom lenses where the nodal point changes a lot depending on the focal length, using the off-axial adapter may mean disassembling the unit and reassembling it with or without the off-axial adapter in place as you zoom the lens. This requires a screwdriver or a coin. Also, adding or removing the off-axial adapter requires a compensating shift in the position of the vertical arm in relation to the horizontal arm. None of this is impossible, but it is fiddly and time consuming. Similarly, some lenses require the use of the off-axial adapter (e.g. 17-40L), while others don't work with it (Canon 50mm) so switching from one lens to another also may require disassembly and reassembly of the off-axial adapter. Lastly, for some lenses (e.g. the Canon 70-200 F4L) the small size of the Nodal Ninja doesn't allow the correct positioning of the camera at many focal lengths regardless of its configuration with or without the off-axial adapter. Nonetheless, the Nodal Ninja does work well with some lenses where the nodal point falls into the range covered by the Nodal Ninja, and doesn't change enough during zooming that it requires disassembly and reassembly of the off-axial adapter. For example, I found that when used with the Canon 17-40L lens on a Canon 20D, it worked well. Cons. During the course of my examination and testing, I did find a couple of areas where the Nodal Ninja could be improved. I've already mentioned what I perceive to be the biggest drawback...its limited adjustment capacity that renders it unusable with some cameras. One other problem that I encountered was the way the horizontal arm rotates around the horizontal turntable. The design is simple, and visually appealing, but a little difficult to use in practice. The knob that tightens the horizontal arm onto the base unit also serves as the axis of rotation for the horizontal arm. As such, it has a tendency to tighten or loosen as the horizontal arm is rotated during use. When rotating the horizontal arm clockwise, the knob gradually tightens to the point where it becomes physically impossible to continue rotating until the knob has been loosened. When rotating the arm in the opposite direction, the knob loosens, and the horizonal arm soon starts to wobble on top of the horizontal turntable until the knob has been tightened. This isn't a problem that prevents the Nodal Ninja from working, but it does effectively mean that rotating the horizontal arm is a two hand procedure...one hand to rotate the arm, and another to tighten or loosen the knob. The instruction manual explains that Teflon spacers can be inserted between the knob and the horizontal arm if you want to rotate the horizontal arm clockwise without loosening the knob every time, but I couldn't get this to work. With or without the Teflon spacers, I needed to tighten or loosen the knob after rotating the horizontal arm. Another quibble is the fact that a single knob is used to secure the EPDM polymer plate onto the camera and axial arm. When loosening the knob to adjust the axial offset, the camera comes loose and has a tendency to rotate. This is mitigated somewhat by the grip of the EPDM polymer plate that mounts onto the camera's tripod socket, but because the plate is so "grippy", the knob has to be very loose in order for the plate to slide along the axial arm. So, unless you are very careful, sliding the camera forwards or backwards on the axial arm has a tendency to cause the camera to rotate and possibly become misaligned. Stability. As a landscape photographer, I often find myself shooting at the start or end of the day when the light is low. And, I frequently use small apertures to produce a wide depth of field. All of this means that I often use very slow shutter speeds. And, the slower the shutter speed, the more important stability becomes. Even a slight movement while the shutter is open can result in blurry pictures. Using a panoramic tripod head -- any panoramic tripod head -- will decrease the stability of the camera. The biggest problem I encounter with stability is the wind. When shooting outdoors, I find that even a mild breeze can be enough to produce pretty blurry images when using a slow shutter speed and/or a long lens. I was curious to try and quantify the degree of instability that adding a panoramic tripod head would introduce. I wanted to come up with a test that would allow me to make meaningful comparisons in stability without requiring complicated test equipment. And, I can't rely on the wind to blow at a constant rate for me to conduct the test with different equipment. The best test I could come up with was to mount the camera on the tripod head, and shoot a picture at a slow speed (1/15 of second in this test) with a long lens (200mm in this test) and see how much vibration the camera's own shutter introduces. This has the advantage of ensuring that exactly the same amount of "wobble" is introduced for each test. My theory is that the more blur is visible in the final image, the less stable is the tripod head. I'm sure this could be further improved, but as a first test, it seems reasonable. Below are the results of my test. All images were taken indoors using a cable release, mounted on a Manfrotto 3001 tripod with a Bogen 3028 head. 100% crops from six images are shown. The top two crops were taken with the camera mounted directly on the Bogen 3028 tripod head. The first was taken without mirror-lockup, and the other was taken with mirror lockup. The middle two were taken with the Nodal Ninja tripod head mounted on top of the Bogen 3028, and the last two were taken with the Panosaurus tripod head mounted on top of the Bogen 3028. (For the Nodal Ninja and Panosaurus test, I mounted the camera with the same axial distance.) With mirror lockup, all of the images look reasonably sharp. Whatever differences still remain could be attributable to auto-focus randomness as much as anything else. However, when mirror lockup isn't used, it is obvious that the panoramic tripod heads aren't adequately stable to produce a sharp image. To my eyes, the Nodal Ninja looks a little blurrier than the Panosaurus, but I wouldn't be thrilled with either image. I haven't been able to test a "professional" model, so I can't say how this compares.
Conclusion. The Nodal Ninja's design is very attractive, and the workmanship quality looks good. Nick is still actively developing the product and I expect further improvements to come. I would summarize it by saying that it is already a good product with room for improvement. Some adjustments to increase the compatibility with more cameras, and some rethinking of the way in which the horizontal arm rotates would go a long way to making this an excellent product. In fact, he has said that he intends to make a longer off-axial adapter to make it compatible with the Nikon 99X series of digicams. And, Nick's intention to make a larger bracket for use with DSLRs is very promising. If the Nodal Ninja works with your camera, then it is worth some serious attention, particularly given its low price compared to professional models. Contact Information: Nodal Ninja web site | |||||||||||